Are you tired of relying on expensive mechanics to fix your RV brakes? Don’t worry, you don’t have to break the bank anymore.
This article will guide you through DIY solutions for your RV brake repairs. We’ve got you covered, from troubleshooting and diagnosis to common repairs and maintenance tips.
So grab your tools and get ready to take control of your RV’s braking system. It’s time to hit the road with confidence and peace of mind.
Types of RV Brake Systems
There are two main types of RV brake systems: drum brakes and disc brakes.
When it comes to disc vs. drum brakes, disc brakes are generally considered to be more efficient and provide better stopping power. They are also less prone to overheating and have a longer lifespan than drum brakes.
Another factor to consider is the type of braking system, whether hydraulic or electric. Hydraulic brake systems use brake fluid to transfer pressure from the brake pedal to the brakes, while electric brake systems use an electrical signal to activate the brakes.
Additionally, if you have an older RV with drum brakes, you may want to consider a disc brake conversion for improved performance.
Lastly, when it comes to trailer brake systems, make sure to explore different brake controller options to find the one that suits your needs and preferences.
Tools and Safety Precautions
Ensure you have all the necessary tools and take proper safety precautions before attempting any repairs. Tool maintenance is crucial for successful DIY RV brake repairs.
Start by checking your brake fluid level and quality. If it’s low or contaminated, make sure to replace it.
Next, inspect your safety gear, including gloves, goggles, and a face shield, to protect yourself from any potential hazards.
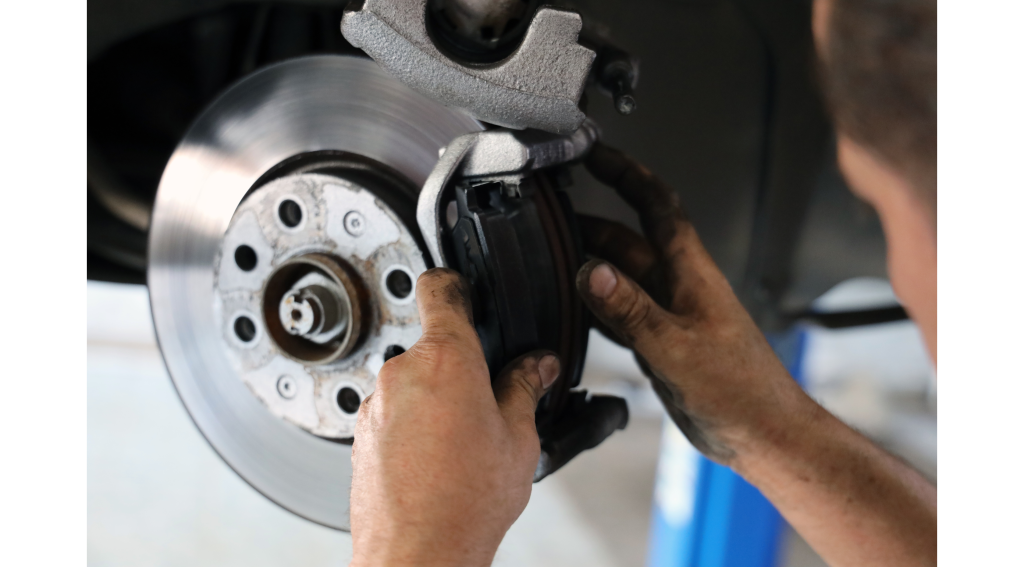
When working on your RV’s brake pads, always use a brake pad spreader tool to compress the caliper pistons safely.
Additionally, inspect your brake lines for any signs of wear or damage and replace them if necessary.
Signs of Brake Problems
Inspect your vehicle for common signs of brake problems, such as squeaking or grinding noises, a spongy brake pedal, or a pulsating sensation when applying the brakes. These warning signs could indicate issues with your brake fluid, brake pedal, brake pads, or brake rotors.
If you hear strange noises, it might mean that your brake pads are worn and need to be replaced. A spongy brake pedal could be a sign of air in the brake lines or a problem with the master cylinder. A pulsating sensation when braking could indicate warped brake rotors.
It’s important not to ignore these signs, as they can compromise your vehicle’s braking performance and safety. Regularly inspecting your brakes and addressing any problems promptly can help ensure your brakes are in good working condition.
Step-by-Step Troubleshooting and Diagnosis
To troubleshoot and diagnose brake problems, start by checking the brake fluid level and inspecting for any leaks. This is the first step in identifying any underlying issues with your RV’s braking system.
Once you have confirmed that the fluid level is adequate and there are no leaks, you can move on to the next troubleshooting steps. Utilize diagnostic tools such as a brake pressure gauge to measure the pressure in the system and identify any abnormalities.
Additionally, inspect the various brake components, such as the brake pads, rotors, and calipers, for any signs of wear or damage. Use repair techniques like bleeding the brakes or replacing worn components to restore optimal brake performance if necessary.
Common Repairs and Their Procedures
Once you’ve identified any underlying issues with your RV’s braking system, it’s important to understand the common repairs and their procedures.
One common repair is brake pad replacement. To do this, remove the wheel and caliper, remove the old brake pads, and replace them with new ones.
Another important repair is a brake fluid flush. This involves draining and replacing the old fluid with fresh fluid to ensure optimal brake performance.
Brake rotor resurfacing is another common repair. This is done by removing the rotor, using a lathe to smooth out any imperfections, and then reinstalling it.
Additionally, brake caliper cleaning should be done regularly to remove dirt and debris that can affect brake function.
Lastly, a brake line inspection is crucial to check for any leaks or damage that could compromise the braking system.
Tips for Air Brake Systems (For Applicable RVs)

If you’re operating an RV with air brake systems, it’s important to familiarize yourself with these tips for proper maintenance and troubleshooting.
First, make sure to regularly bleed your brakes to remove any air bubbles that may have formed in the system. This will ensure optimal brake performance.
Additionally, adjusting slack adjusters is crucial for maintaining proper brake shoe clearance.
You should check the air pressure in your brake system regularly to ensure it meets the manufacturer’s specifications.
If you notice any signs of wear or damage, you must promptly replace your brake pads to prevent further issues.
Finally, consider upgrading to disc brakes, as they offer improved stopping power and are less prone to overheating.
These tips will help keep your RV’s air brake system in top-notch condition.
Preventative Maintenance and Care
Ensure you regularly inspect and clean the air filter in your RV’s air brake system to prevent debris from causing damage.
Proper brake maintenance is crucial for the safety of your RV and everyone on the road. Regular brake inspection, lubrication, adjustment, and cleaning ensure your brakes work optimally.
Inspect the brake components for wear or damage, such as worn brake pads or leaking brake fluid. Lubricate the moving parts to prevent friction and ensure smooth operation. Adjust the brakes to maintain the proper balance and responsiveness.
Lastly, clean the brakes to remove any dirt, dust, or debris that may impair performance. By following these steps, you can ensure your RV’s brakes are in top-notch condition, providing you with a safe and worry-free journey.
Conclusion: Keep Your Travels Safe with Proper Brake Care
In conclusion, when it comes to RV brake repairs, don’t panic! With the right tools, safety precautions, and some DIY know-how, you can tackle common brake issues independently.
By troubleshooting and diagnosing the problem step-by-step, you can easily identify and fix any brake-related issues. Remember to perform regular preventative maintenance to keep your brakes in top shape.
So don’t break down, take control, and confidently handle your RV brake repairs!