30-amp RV plug and outlet wiring is part of RV electrical systems, intended to securely feed power to various appliances and devices within the RV. A 30 Amp RV plug generates 120V of power and is rated for up to 3,600 watts, perfect for smaller RVs with moderate electrical needs.
30 Amp RV plug wiring involves connecting the hot, neutral, and ground wires to their respective terminals in the 30 Amp RV outlet, ensuring that the electrical system operates efficiently and safely. A 30 Amp RV plug wiring diagram clearly illustrates how these wires must be connected, ensuring the correct installation and preventing potential wiring errors. Understanding the difference between a 30-amp RV plug and a 50-amp RV plug is vital, as the latter offers higher power capacity and is used for larger RVs with more demanding electrical systems.
Checking for proper voltage and grounding when diagnosing a 30-amp RV outlet ensures safety. Special considerations arise when using 30-amp RV plugs with travel trailers and generators, as compatibility must be confirmed to avoid overloading or damaging the electrical system. Safety guidelines and color coding requirements in 30-amp RV wiring help mitigate accidents and guarantee that the setup is up to code, producing dependable and secure electrical power to the RV.
What is a 30 Amp RV plug?
A 30-amp RV plug is a specialized electrical connector designed to power an RV’s electrical system. The purpose of the electrical connector is to supply 120V power, allowing the RV to run appliances and other electrical equipment on the road or at campsites. A 30-amp RV plug is used in RV plug wiring to connect the vehicle to an external power source at campgrounds or RV parks. The standard configuration of a 30-amp RV plug consists of three prongs, one for the hot wire, one for the neutral, and one for the ground. The setup ensures a safe and efficient power supply for Recreational Vehicle Use. The RV plug is widely used in applications with moderate power demand, such as for lights, small appliances, and air conditioning units in RVs.
Why do you need 30 amp RV outlet?
You need a 30-amp RV outlet to safely power electrical systems on the road or at campgrounds. RVs require a 30-amp outlet because it provides the correct power to operate essential appliances and equipment, such as lights, air conditioning, and small kitchen appliances. The outlet is rated to handle the power demands of an RV’s electrical system, ensuring that the RV’s appliances operate at peak performance without risking overheating or damage. Properly rated RV outlets are crucial because they minimize electrical faults, short circuits, and other safety hazards that occur when the outlet is not capable of supplying the necessary power for Recreational vehicles.
What does a 30 Amp RV Plug Wiring Diagram Look Like?
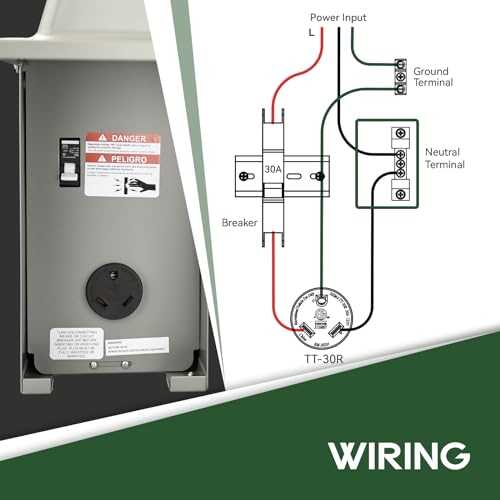
The 30AMP RV plug wiring diagram looks like a circular representation of the plug’s face, showing three prongs arranged in a specific configuration, one for the live wire, one for the neutral wire, and one for the ground wire. The live wire transmits the electrical current from the power source to the RV. The neutral wire provides a return path for the electrical current to complete the circuit.
The ground wire serves as a safety feature, redirecting any stray electricity to the ground to prevent electrical shocks or fires. Proper wiring ensures that these wires are connected correctly to maintain safe and efficient power flow to the RV. Incorrect wiring causes electrical hazards, damage to the RV’s appliances, or even fire. Proper connections facilitate the RV electrical system’s function smoothly, preventing malfunction and enhancing safety during use.
What are the Key Components of a 30 Amp RV Plug Wiring Setup?
The key components of a 30 Amp RV plug wiring setup are listed below.
- Breaker: The breaker is a safety device that automatically cuts off the electrical supply if the system experiences an overload or short circuit. The breaker is a protective measure to prevent damage to the RV’s electrical system or components, reducing the fire risk. Breakers are essential for protecting the RV and external electrical infrastructure from damage caused by excessive power surges.
- RV Plug: The RV plug is the connector that links the RV to the external power supply at campgrounds or RV parks. RV plug securely transmits electrical power from the outlet to the RV’s electrical system, ensuring that appliances, lighting, and other systems receive the necessary power. Proper connection prevents electrical issues such as power loss or short circuits.
- Outlet: The outlet is the point of contact between the external power source and the RV plug. The outlet‘s role is to supply 120V power to the RV through the plug, enabling the RV to operate its electrical systems. Outlets are installed at campgrounds, RV parks, or other locations that cater to RVs. The proper installation and maintenance of the outlet are essential for ensuring a stable and safe power connection.
- Wiring (Hot, Neutral, Ground): The hot wire carries the electrical current from the power source to the RV. The hot wire provides the necessary power to operate the RV’s appliances and systems. An incorrectly installed or maintained wire causes power interruptions or electrical fires. The neutral wire provides the return path for the electrical current after it has passed through the RV’s systems. It completes the circuit and allows for the safe return of electricity to the power source. An incorrectly wired neutral wire causes imbalanced power distribution and equipment malfunction. The ground wire is a safety feature that directs any stray or excess electrical current into the earth, preventing potential electric shocks or fires. An improperly connected ground wire poses electrical hazards, including shock risks for anyone interacting with the RV’s systems.
How to Wire 30 amp RV Plug?
To wire 30 30-amp RV plug, follow the eleven steps listed below.
- Turn Off the Power. Disconnect the electrical source before starting to avoid electrical hazards.
- Gather Materials: Collect the proper tools and materials, including a 30-amp RV plug, appropriate gauge wire (10/3), a screwdriver, and a wire stripper.
- Strip the Wire Insulation. A wire stripper removes about 1 inch of insulation from each wire (hot, neutral, ground), exposing the copper or aluminum wire.
- Prepare the RV Plug. Unscrew the cover of the 30 Amp RV plug to access the terminal screws.
- Connect the Hot Wire (Black). Insert the stripped end of the hot wire (black) into the terminal labeled “hot” or “live.” Tighten the terminal screw securely to hold the wire in place.
- Connect the Neutral Wire (Gray). Insert the stripped end of the neutral wire (gray) into the terminal labeled “neutral.” Tighten the terminal screw securely.
- Connect the Ground Wire (Green). Insert the stripped end of the ground wire (green) into the terminal labeled “ground.” Tighten the terminal screw securely.
- Double-Check Connections. Ensure that all wires are securely attached to the terminals and that no stray wires touch other components inside the plug.
- Reassemble the RV Plug. Replace the RV plug cover and tighten the screws to hold it in place.
- Test the Connection. Connect the plug to the outlet and test the RV’s electrical systems. Ensure that the breaker is functioning correctly and that no wires are overheating.
- Follow Safety Protocols. Wear insulated gloves, pick tools with insulated handles, and never work with electrical components when the power is live to minimize the risk of shock or injury.
How do You Wire a 30 Amp RV Outlet Correctly?
Wire a 30-amp RV outlet correctly by performing the nine steps to secure a safe and organized setup. First, verify that the power to the electrical panel is completely turned off to avoid any electrical hazards. Second, install the 30-amp RV outlet box in a suitable location, securing it to a wall or other structure.
Third, strip approximately 1 inch of insulation from the ends of the hot, neutral, and ground wires using a wire stripper. Fourth, connect the hot wire (black) to the terminal marked “hot” or “live” on the outlet, ensuring the wire is securely tightened in place. Fifth, connect the neutral wire (gray) to the terminal marked “neutral,” and tighten the terminal screw. Sixth, attach the ground wire (green) to the ground terminal and tighten the screw to ensure it is secure.
Seventh, match wire colors to their designated terminals. The black wire goes to the hot terminal, the gray wire to the neutral terminal, and the green wire to the ground terminal. Miswiring leads to electrical faults and potential safety hazards. Eighth, double-check the connections after all cables are securely connected to ensure no loose wires are causing electrical issues.
Lastly, ensure all connections are tight by pushing the outlet back into the box and securing it with screws, to ensure the outlet is mounted securely. Turn the power back on and test the outlet using a voltage tester to ensure it provides the correct 120V power. Wiring the outlet guarantees safe and reliable power for the RV’s electrical systems.
Matching wire colors to their designated terminals is critical for safety. The hot wire must go to the hot terminal (black), the neutral wire to the neutral terminal (gray), and the ground wire to the ground terminal (green). Incorrect wiring leads to electrical faults, safety hazards, or damage to the RV’s electrical systems. Ensuring all connections are tight and secure is crucial for preventing loose wiring, which results in poor electrical contact, overheating, or fire risks. Proper installation and maintenance of the 30-amp RV outlet ensure safe and dependable power for the RV’s electrical systems.
How to Wire a 30 Amp RV Plug to the Breaker Box?
To wire a 30 Amp RV Plug to the breaker box, follow the ten steps listed below.
- Turn Off the Power. Disconnect the main power supply to the breaker box before proceeding to avoid electrical hazards.
- Select the Correct Breaker. Choose a 30-amp double-pole circuit breaker. The breaker is designed to handle the power requirements of a 30-amp RV plug and provide overcurrent protection.
- Prepare the Wires. Using a wire stripper, strip approximately 1 inch of insulation from the ends of the hot, neutral, and ground wires. It exposes the copper or aluminum wire for proper connection.
- Connect the Hot Wire (Black). Insert the stripped end of the hot wire (black) into one terminal of the 30-amp circuit breaker. Tighten the terminal screw securely to ensure a firm connection.
- Connect the Neutral Wire (Gray). Insert the stripped end of the neutral wire (gray) into the neutral bar in the breaker box. It is located next to the breaker terminals. Tighten the screw to secure the wire.
- Connect the Ground Wire (Green). Insert the stripped end of the ground wire (green) into the ground bar in the breaker box. Tighten the screw to ensure the ground wire is securely attached.
- Install the Breaker. Insert the 30-amp double-pole circuit breaker into the designated space on the breaker panel. Snap it into place, ensuring it is securely mounted.
- Double-check all Connections. Ensure all wires are securely connected to their respective terminals and that no loose or exposed wires pose a hazard.
- Test for Proper Grounding. Perform a grounding check after completing the wiring to ensure the system is grounded correctly. An improperly grounded system leads to electrical shock hazards or malfunction.
- Restore Power and Test. Turn the main power supply back on and test the RV plug by connecting it to an RV and verifying that the electrical systems work correctly. Use a voltage tester to ensure the outlet is providing the correct voltage. Properly wiring the 30-amp RV plug to the breaker box ensures safe and reliable electrical power to the RV. Taking the necessary safety precautions, such as grounding and securely tightening connections, helps prevent electrical issues and guarantees the safe operation of the system.
What Size Wire is Required for a 30 Amp RV Outlet?
The size required for a 30-amp RV outlet is 10 AWG wire, although 12 AWG wire is sometimes used for short distances. AWG stands for American Wire Gauge, a standard system used to measure the thickness or diameter of electrical cables. 10 AWG wire is preferred because it is designed to handle the 30-amp current capacity needed for RV power systems. Using the correct wire size is crucial for ensuring the safety and efficiency of the electrical system.
The gauge of the wire directly impacts its ability to handle the electrical load without overheating. A wire that is too small, such as 12 AWG, is unlikely to support the 30-amp current, leading to excessive heat, potential melting of insulation, and increased fire risk. 10 AWG wire safely carries the current over longer distances without the risk of overheating.
Several factors must be considered when deciding on wire size, including the wire run length and amperage. Longer distances require a thicker wire to reduce resistance and minimize voltage drop, ensuring the RV’s electrical systems receive sufficient power. Using 10 AWG wire for a 30-amp RV outlet prevents electrical malfunctions and enhances safety.
How to Install a 30 Amp RV Outlet at Home?
To install a 30-amp RV Outlet at home, follow the nine steps listed below.
- Plan the Installation. Decide on the location for the outlet near where the RV is parked, and ensure the home’s electrical panel has enough capacity to handle a 30-amp breaker.
- Gather Materials. Collect the necessary materials, including a 30-amp RV outlet (NEMA TT-30R), 10-gauge wire (suitable for 30 Amps), a single-pole 30-amp breaker, a weatherproof outlet box (for outdoor installations), and tools such as a drill, wire stripper, screwdriver, electrical tape, and multimeter.
- Turn Off the Power. Shut off the main breaker to ensure safety while working with electricity.
- Install the Outlet Box. Mount the outlet box securely to a wall or post, ensuring that it is weatherproof and installed at least 24 inches above the ground if it is outdoors.
- Run the Wiring. Connect the outlet to the breaker panel using 10-gauge wire, threading the wire through a protective conduit if necessary for extra safety.
- Connect the Wires. Connect the black wire to the hot terminal at the outlet, the white wire to the neutral terminal, and the bare or green wire to the ground terminal. Connect the black wire to the new 30-amp breaker at the breaker panel, the white wire to the neutral bus, and the ground wire to the ground bus.
- Install the Breaker. Snap the 30-amp breaker into an available slot in the panel.
- Test the Outlet. Use a multimeter to check the voltage and ensure proper wiring, and test the outlet with an RV surge protector before plugging in the RV.
- Secure and Finish. Replace the panel cover and tidy the work area. Use an outdoor-rated outlet if the installation is outside to protect it from weather conditions. Hiring a licensed electrician if the homeowner is unfamiliar with electrical work is highly recommended to ensure the installation is safe and complies with local codes.
What is the Difference Between a 30 Amp RV Plug and a 50 Amp Plug?
The difference between a 30-amp RV plug and a 50-amp RV plug lies in power rating and physical characteristics. A 30-amp RV plug provides 3,600 watts of power, perfect for smaller RVs and models with fewer electrical appliances. A 50-amp RV plug delivers up to 12,000 watts, ideal for larger RVs with power-intensive systems like multiple air conditioners, electric heaters, and other high-demand appliances.
The two plugs differ physically in their number of prongs and size. A 30-amp RV plug features three prongs, one for the hot wire, one for neutral, and one for ground. It is smaller and designed for lower power needs. A 50-amp RV plug has four prongs, two hot wires, one neutral, and one ground. The design allows for a higher power capacity to supply larger RV electrical systems. The 50-amp RV plug is larger to accommodate the two hot wires for 240 volts, which is required for larger RVs.
The 30 Amp RV plug has fewer electrical or lower power needs, while the 50 Amp RV plug is intended for RVs with bigger electrical systems and more appliances. Using the recommended plug type for each RV guarantees that devices and electrical systems receive the correct voltage and avoid severe damage or safety hazards.
How to Upgrade from 30 Amp to 50 Amp RV Service?
Upgrading from a 30-amp to a 50-amp RV service is an excellent option for RV owners with larger RVs or owners who use more power-hungry appliances. A 50-amp service provides more power (up to 12,000 watts), ideal for powering multiple air conditioners, high-demand appliances, or other electrical systems in larger RVs. The upgrade ensures a more reliable and efficient power supply, preventing overloads and allowing for better compatibility with modern RV electrical setups.
To upgrade from 30 Amp to 50 Amp RV service, follow the nine steps listed below.
- Plan the Upgrade. Assess the RV’s electrical needs and verify that the current electrical panel supports a 50-amp RV plug. Consult an electrician to evaluate whether the home’s electrical system handles the new service.
- Gather Materials. Collect the required materials, including a 50-amp RV plug, 6-gauge wire (typically for 50 Amps), a 50-amp breaker, a weatherproof outlet box (if installing outdoors), and appropriate tools such as a wire stripper, drill, screwdriver, and multimeter.
- Turn Off Power. Shut off the main breaker in the electrical panel to ensure safety while working with electricity.
- Remove the Existing 30 30-amp outlet. The existing outlet and wiring must be removed carefully if upgrading from a 30 Amp service.
- Install the new 50-amp outlet. Mount the new weatherproof outlet box (for outdoor installations) and securely attach the 50-amp RV plug. Connect the black wire (hot) to one terminal, the red wire (second hot) to the second terminal, the white wire (neutral) to the neutral terminal, and the green wire (ground) to the ground terminal.
- Upgrade the Wiring. Run 6-gauge wire from the new outlet to the breaker panel. If required, thread the wire through a protective conduit to ensure safety and longevity.
- Replace the Breaker. Install a 50-amp breaker in the electrical panel. Connect the black and red wires to the new breaker terminals, the white wire to the neutral bus, and the green wire to the ground bus. Ensure all connections are tight and secure.
- Consider Electrical Panel Upgrades and Breaker Changes. Consider upgrading the electrical panel if the current electrical panel does not have enough space for the new breaker or is not rated to handle the higher power demands. Ensure that the panel accommodates the 50-Amp RV plug and that the system handles the new 50-Amp load. A professional electrician must perform the upgrade to ensure safety and compliance with local codes.
- Test the System. Turn the power back on and use a multimeter to check the voltage at the outlet once the outlet and breaker are installed. Ensure it provides the correct 240 volts. Test the system by plugging in the RV and verifying it runs correctly. Upgrading to a 50-amp RV service is a key part of RV upgrades, ensuring that electrical systems are better prepared to meet the higher power demands of larger RVs or multiple appliances. Contact a licensed electrician if the upgrade process seems complex to guarantee proper installation and compliance with local electrical codes.
How do You Test a 30 Amp RV Outlet for Proper Wiring?
Test a 30-amp RV outlet using a voltage tester or multimeter for proper wiring. Ensure the outlet’s power is on and the main breaker is in the “on” mode. Set the multimeter to test AC voltage using the 200- 250V range. Insert the multimeter probes into the outlet’s hot and neutral slots. A correctly wired 30-amp outlet must show a voltage measurement of 120 volts between the hot and neutral terminals.
Check the grounding by inserting the multimeter’s black probe into the neutral slot and the red probe into the ground slot (if available). A correctly grounded outlet must show zero or very close to zero voltage. Multimeters display incorrect or fluctuating readings if the grounding is faulty.
Common issues that indicate improper wiring include low voltage or no power. Low voltage readings, such as below 110 volts, suggest a problem with the neutral connection or an overloaded circuit. No power during testing implies a circuit break or an issue with the hot wire. Improper grounding leads to shock hazards or damage to connected appliances. Perform these checks to ensure the outlet is functioning safely.
What are Common Mistakes When Wiring a 30 Amp RV Plug?
The common mistakes when wiring a 30-amp RV Plug are listed below.
- Using Incorrect Wire Gauge: An undersized wire gauge, such as 12 AWG instead of 10 AWG for a 30-amp RV plug, is a common mistake. The wire overheats due to insufficient electrical load capacity. The dangers include fire hazards and damaged electrical components from overloading. Use the correct wire gauge (10 AWG) that matches the power needs of the 30-amp system to avoid it. Double-check the wire size before installation to ensure it is appropriate for the amperage.
- Loose Connections: Loose or poorly tightened wire connections at the terminals are another common mistake. Loose connections cause arcing, leading to heat buildup and fire hazards. Loose wires result in intermittent power supply or power outages. Ensure that cables are tightly secured to the terminals and that no exposed wires are left outside the connector. Use a torque screwdriver to ensure proper tightness and prevent loosening over time.
- Improper Grounding: Improper or absent grounding is a critical mistake leading to electric shocks and equipment damage. Static currents build up if the ground wire is not connected correctly, posing serious risks to the RV and anyone interacting. Ensure that the ground wire is securely connected to the ground terminal in the RV plug and the electrical panel. Check the grounding with a multimeter to confirm it is functioning correctly.
- Incorrect Terminal Wiring: Connecting wires to the wrong terminals is another common mistake. For example, the hot wire must connect to the “hot” terminal, the neutral wire to the “neutral” terminal, and the ground wire to the ground terminal. Incorrect terminal wiring causes electrical shorts, overheating, or device damage. Verify the correct wire placement according to color-coding and terminal labels before securing the connections to avoid the mistake. Double-check each terminal connection to confirm accuracy.
- Not Using a Properly Rated Outlet: A substandard or incorrectly rated outlet for the 30-Amp service results in overheating, poor connections, and power outages. An outlet not designed to handle 30-amps melts or degrades over time. Use an outlet rated for 30 Amps and certified for RV use to avoid the mistake. Check the outlet’s specifications before installation to ensure it matches the required amperage.
Overloading the Circuit: Overloading the circuit by connecting too many high-power appliances to the 30 Amp service is a common mistake. It causes circuit breaker tripping, power outages, or even fires. Know the wattage capacity of the RV’s electrical system and do not exceed the 30-amp limit to avoid overloading. Spread out high-power appliances like air conditioners to prevent exceeding the system’s load capacity.
How to Wire a Travel Trailer 30 Amp RV Plug?
To wire a Travel Trailer 30 Amp RV Plug, follow the eight steps listed below.
- Turn Off the Power. Shut off the main breaker to guarantee safety while working with electricity and to avoid electrical shock or injury during installation.
Gather Materials. Gather a 30-amp RV outlet (NEMA TT-30R), 10-gauge wire (suitable for 30 Amps), a single-pole 30-amp breaker, and tools such as a wire stripper, screwdriver, and multimeter, ensuring the tools are insulated for safety. - Install the Outlet Box. Mount the outlet box securely to a wall or post, ensuring proper positioning for easy access. Use a weatherproof outlet box for outdoor installations to protect the components from environmental damage.
- Run the Wiring. Use 10-gauge wire to connect the outlet to the breaker panel, and thread the wire through a conduit if required for added protection while ensuring proper grounding to avoid electric shocks.
- Connect the Wires. Connect the black (hot) wire to the brass terminal, the white (neutral) wire to the silver terminal, and the green or bare (ground) wire to the green terminal. Matching wire colors to terminal markings ensures correct connections and prevents short circuits, fire hazards, or appliance damage, while grounding the wire securely to avoid electrical shocks.
- Install the Breaker. Snap the 30-Amp breaker into an available slot in the panel, ensuring the system shuts off in case of overload, preventing fire hazards and protecting electrical equipment.
- Test the Outlet. Use a multimeter to check the voltage, ensuring the reading is around 120 volts between the hot and neutral terminals. Test with an RV surge protector to prevent power surges that damage the Travel Trailer RV’s electrical system.
- Safety and Grounding Considerations. Properly ground the wire at the outlet and the breaker panel to avoid electric shocks, and ensure compliance with local codes to ensure the installation is safe, legal, and reliable.
Can you Use a 30 Amp RV Plug for Other Applications?
Yes, you can use a 30-amp RV plug for other applications, such as powering outdoor equipment or tools. The 30 Amp RV plug (NEMA TT-30) is designed for 120V power and handles up to 3,600 watts. Ensuring the powered equipment is compatible with these specifications is crucial to avoid overloading the plug.
Using the 30 Amp RV plug for non-RV purposes poses safety concerns if not properly grounded or protected from overcurrent. Overloaded circuits cause electrical shocks, fires, or damage to connected devices. Ensure that the equipment is grounded correctly, and never use more power than the plug is rated for to minimize these risks.
The 30-amp RV plug is unsuitable for 240V appliances or devices requiring more than 30 Amps of current. The plug must be housed in a weatherproof outlet box to prevent moisture and corrosion, ensuring safe operation in all weather conditions.
Ensure a 30-amp RV plug complies with local electrical codes and regulations. Consulting a licensed electrician is highly recommended before using the plug for non-RV applications. An expert electrician helps determine whether the plug is suitable for the intended use and provides guidance on safe installation.
What are the Safety Precautions When Wiring a 30 Amp RV Plug?
The safety precautions when wiring a 30 Amp RV Plug are listed below.
- Secure Wiring: The wiring must be tightly connected to its terminals. Loose or poorly connected wires cause arcing, heat buildup, and potential fire hazards. Double-check that all connections are tight and that no exposed wire is left outside the connectors.
- Turn Off the Power Supply: Ensure the power is turned off at the main breaker before beginning any electrical work. Disconnecting the power supply when working with wiring helps avoid electrical shock or injury.
- Use Properly Rated Tools and Equipment: Ensure that all tools, such as wire strippers, screwdrivers, and multimeters, are rated for electrical work. Use insulated tools to reduce the risk of accidental shocks. Verify that the RV plug, wire, and breaker are rated for 30 Amps to ensure compatibility and safety.
- Grounding: Proper grounding is necessary for safety. Ground wires must be securely connected to ground terminals at the RV plug and breaker panel. It provides a safe path for electricity in case of a fault, preventing electric shocks or fires.
- Avoid Overloading: Never exceed the amperage rating of the plug or the circuit. Overloading the circuit leads to overheating and potential damage to the electrical system. Check that the RV plug and wiring match the RV’s power needs.
- Follow Local Codes: Follow local electrical codes and regulations to confirm that the installation is legal, safe, and meets all safety standards. Non-compliance results in safety hazards and failure to meet insurance or safety requirements.
How to Connect a 30 Amp RV Plug to a Generator?
To connect a 30 Amp RV plug to a generator, follow the eight steps listed below.
- Turn Off Power to the Generator. Verify the generator is turned off before connecting to avoid electrical shock or injury.
- Gather Required Materials. Collect a 30-amp RV plug, a 30-amp extension cord, and a 30-amp outlet (TT-30 outlet) generator. Ensure the extension cord is rated for 30 Amps to handle the electrical load safely.
- Match Generator Output to Plug Rating. Check the generator’s output to see if it matches the plug rating. A 30-amp RV plug is designed for use with a 30-amp generator output, 120V. Using a mismatched generator damages the generator and the RV’s electrical system, resulting in overheating, malfunction, or system failure. Verify that the generator provides a stable 30-amp output to power the RV safely.
- Connect the Extension Cord to the Generator. Plug the 30-Amp extension cord into the generator’s 30-Amp outlet. Ensure the connection is secure and the plug fits properly without being forced to do so. It ensures proper power flow from the generator to the RV.
- Connect the Extension Cord to the RV Plug. Insert the other end of the extension cord into the RV’s 30-amp plug. Double-check the connection to ensure it is secure and that no wires are exposed, which leads to safety issues.
- Ensure Proper Grounding. Proper grounding is critical for safety, so verify that the generator is properly grounded before turning it on. Proper grounding prevents electrical shocks and provides a safe path for stray electricity, which helps ensure safe operation of the generator and the RV’s electrical system.
- Turn On the Generator. Turn on the generator and ensure that the RV plug receives power. Use a multimeter to verify the voltage is correct (120V). It confirms the generator is providing the appropriate power to the RV.
- Test the RV’s Electrical System. Turn on the RV’s lights, appliances, or other devices to ensure the generator provides stable power. The generator supplies the correct voltage and current to the RV if everything functions properly.
- Check Safety Features. Check that safety features, such as overload protection and circuit breakers, are built into generators for RV 30 Amp. The features help mitigate electrical failures to the generator and the connected electronics in case of power surges or electrical faults. A surge protector to safeguard the RV’s electrical systems from voltage spikes is highly recommended, as it protects sensitive electronic equipment.
What is the Difference Between TT-30 and NEMA 10-30 RV Plugs?
The difference between TT-30 and NEMA 10-30 RV plugs is their design, voltage, and safety features. The TT-30 plug is a 30-amp, 120V plug used in modern RVs. The TT-30 plug features three prongs, one for the hot wire, one for the neutral, and one for the ground. The design provides proper grounding and safety when using electrical appliances in an RV. The TT-30 plug is used in RV parks and campgrounds, providing 120V power for RVs, making it a safe and standardized connection for modern RV systems.
The NEMA 10-30 plug is an older 30-amp, 240V plug. It has three prongs, but unlike the TT-30, it uses two hot wires and one neutral wire, providing higher voltage for appliances such as electric dryers or older RV setups. The NEMA 10-30 plug does not include a dedicated ground prong, which creates safety issues in modern electrical setups. It is unsuitable for current RVs, which require proper grounding for safe operation.
The key differences between the TT-30 and NEMA 10-30 plugs are the voltage they deliver and their grounding capabilities. The TT-30 is designed for 120V, 30-amp applications, commonly used in most modern RVs, and provides grounding for safety. The NEMA 10-30 plug is made for 240V, 30-amp applications but lacks grounding, making it more dangerous for use in modern RVs.
The NEMA code is a standardized system that identifies plugs and outlets based on voltage, amperage, and configuration. Understanding these codes helps ensure the correct plug is used with the appropriate electrical system, minimizing the risk of overloading, electrical faults, or damage. The NEMA 10-30 and TT-30 plugs are distinguished by their respective NEMA codes, which provide critical information about their power capacity and compatibility.
What are the Color Codes for Wiring a 30 Amp RV Plug?
The color codes for wiring a 30 Amp RV plug facilitate proper and safe connections. Black is used for the hot wire, which carries the electricity from the power source to the RV. White is used for the neutral wire, providing the electrical current’s return path. Green (or bare) is used for the ground wire, safely directing any stray electrical current to the ground and preventing electrical shock hazards.
Following the correct color codes is critical for safety. Using the wrong wire for each terminal leads to dangerous situations, such as electrical shorts, power surges, and the risk of electrical shocks or fires. Ensuring that the black wire is connected to the hot terminal, the white wire to the neutral terminal, and the green wire to the ground terminal minimizes these risks. Maintaining an efficient and safe electrical system is a must.
Color codes vary in different countries or with older electrical systems. For example, red is used for hot wires in some countries instead of black. Older systems have used different conventions, such as blue for neutral or yellow for ground. Verifying the wiring and color codes when working with older setups or in international settings avoids confusion and promotes peace of mind.